|
|
Quick
and Easy Gel Buttons in Canvas™ 7
Part Four |
 |
|
|
|
|
|
|
Shifting The Hue To Create a Rainbow
of Colored Buttons
As you will have noticed, we are using
the HSL color model for the button. The colors used
in Objects 1, 2 and 4 follow the pattern in the following
table:
| |
Object 1 |
Object 2 |
Object 4 |
| H |
h |
h |
h |
| S |
100 |
100 |
100 |
| L |
15 |
50 |
40 |
In the table above, the h stands
for the value of the hue. Using the HSL color model
simply choose any value between 1 and 360 for h.
The value for the yellow hue of the master button is
60. The colors used in Objects 1, 2 and 4 have 60 as
the value for the hue in all of them. You change the
color of the button simply by entering the same value
for the fill ink in Objects 1 and 2 and for the second
color of the gradient fill of Object 4. The rainbow
of buttons shown in the graphic below was produced by
using a value of 0 (zero) for the hue in the first one
on the left and by incrementing this value by 30 for
each button to produce 12 different colored buttons.
Try some variations of your own. There are 348 additional
combinations.
17. Let's go through the steps to change
the color of the button. Start by selecting the object
at the bottom of the stack ("Object 1"). Right-click
(Windows®) or Control-click
(Mac®) to access the context
menu. The objects directly under the point where the
mouse was clicked will appear in the menu. Choose the
bottom one in the stack.
18. Bring up the Color manager in the
Inks palette (click
here for more on creating colors with the Color manager).
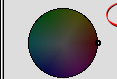
Choose either "HSL Wheel" or "HSL Bars".
19. Enter zero for the hue (circled below
bottom), then make sure the Fill icon is depressed (circled
below top) then click "Apply". The color of
"Object 1" will change to dark red.
Click
Here To Continue...
|