|
|
| |
|
|
 |
| |
| |
|
Intermediate |
|
| |
|
|
QuarkXPress™
Technical Manual Project
Part 3A - Create The Master Pages |
 |
|
|
|
|
|
|
Return
To Technical Manual Project Index
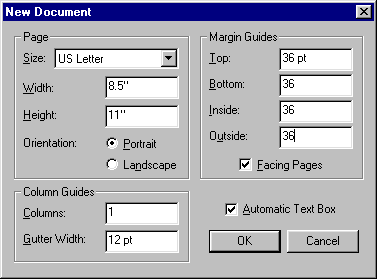
1. Launch QuarkXPress and create a new document by
clicking File > New Document. This opens the
New Document dialog. Choose "US Letter" from
the "Size" box and Quark™ will supply
the 8 1/2 x 11 inch paper dimensions. Enter 36 points
for each of the Margin Guides. If the default units
of measurement are setup in points, you don't have to
enter "pt" after each number. Click each of
the "Facing Pages" and "Automatic Text
Box" check boxes. The data placed in this dialog
sets up the default master page for the document. Click
"OK".
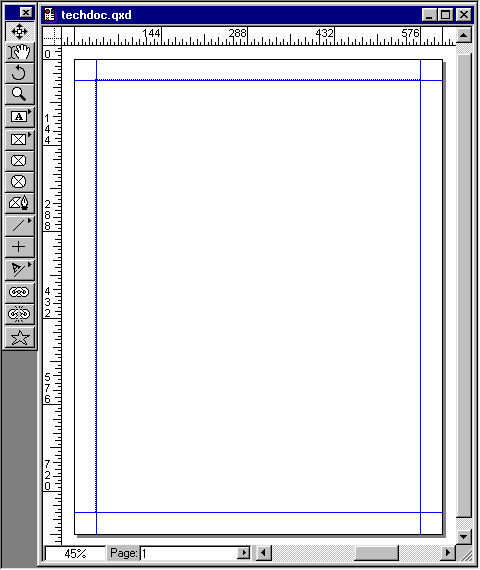
2. At this point Quark will insert
one blank master page (which it calls "A-Master
A" and which you can rename) and one blank document
page into the document. Click File > Save,
name the file "techdoc.qxd" then click "Save".
A master page is a page you design which can be applied
to any document page. Master pages give a document a
distinct and consistent look. You place text and picture
boxes, page rules and other objects on a master page
just like any other document page. The big advantage
to using master pages (like style tags) is that changes
made to one master page will reflect on all the pages
of your document to which the master page has been applied.
Below is the "Document View" showing the blank
page.
3. There are three views (or displays) in Quark. There
is a document view, a master page view and a thumbnails
view. Quark doesn't express these views in exactly these
terms, but they exist, nevertheless. You shift between
document and master pages as you work. One way to shift
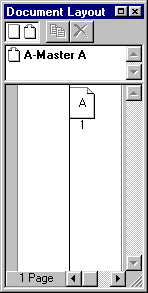
between them is via the Document palette (below).
The Document palette is divided into three sections.
The top section contains blanks for creating new master
pages. There is a blank for single pages and a blank
for facing pages. The center section contains the master
pages that have been defined in your document and the
bottom section displays the document pages along the
spine of the document. You create a new master page
by dragging a blank from the top to the center section.
You apply existing master pages to the document by dragging
them from the center section to pages in the bottom
section.
You shift to the document by double-clicking on any
document page icon in the bottom section. You shift
to a master page by double-clicking on any master page
icon in the center section.
The "A" in page one of the Document palette
shown below shows that page one is based on the "A-Master
A" master page (defined in step 1 above). Double-click
the master page icon "A-Master A" for the
next step.
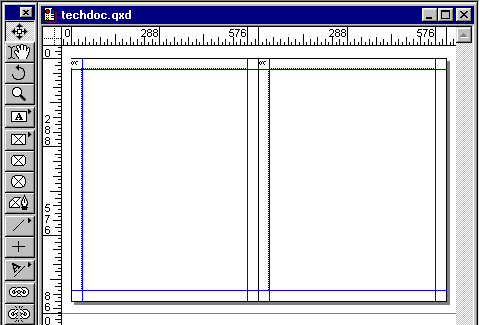
4. Below are the master pages of the spread created
in step 1. Click the Item tool  (the top button in the Tool Palette) to prepare for
the next step.
5. The first thing to place in our master pages will
be page guides for objects to snap to. You also can
place page guides on individual document pages but when
each page requires guides in the same positions, it
makes more sense to make one set of guides
on a master page that will appear on every page of your
document.
The zoom factor affects the precision of the placement
of page guides. You determine the zoom factor by trial
and error. The zoom factor you choose in setting up
your own master pages will depend upon where the page
guides will be placed. In this case zoom to 400%.
If the rulers and the Measurements palette are not already
showing, click View > Show Rulers and View
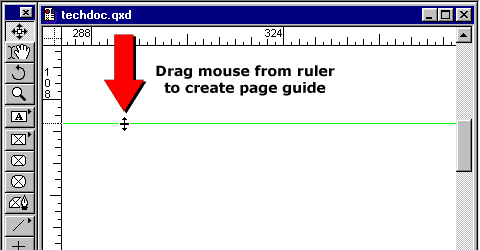
> Show Measurements to display them. Drag the
mouse from the top ruler downwards watching the Measurements
palette as you drag. When the y-coordinate reaches 112.5
points, release the mouse button.
6. The y-coordinate will be displayed in the Measurements
palette so long as the mouse button is held down while
dragging a horizontal page guide. Conversely, the x-coordinate
will be displayed while dragging a vertical page guide.
As soon as the mouse button is released, the coordinate
value will disappear from the Measurements palette.
There is no way to select a page guide and position
it with the measurements palette by entering values
in the x and y coordinates. This is why the zoom factor
must be worked out before creating or repositioning
page guides. Page guides are deleted by first selecting
the Item tool then dragging the page guide into the
ruler and releasing the mouse button.

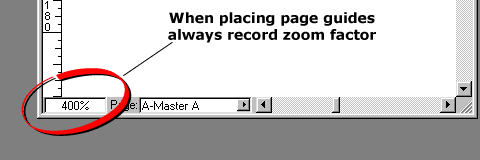
7. That brings us to a very important point about using
QuarkXPress. Always record the zoom value used to position
page guides in the event that they become inadvertently
repositioned. Beginning with version 4.04, Quark has
included the Guides Manager extension. This utility
will enable you to lock page guides and prevent their
being moved by accident. Prior to the Guides Manager,
it was often faster to ditch a page and recreate it
by pasting the page objects on a new page than to try
to fool with repositioning page guides.
Still, I recommend making a printout of a master page
and recording all the specifications of page guides
and repeating objects (like text boxes and rules) in
addition to the zoom factors needed for positioning
page guides. Use the printout as a map for creating
catalogs, newsletters and other periodicals.
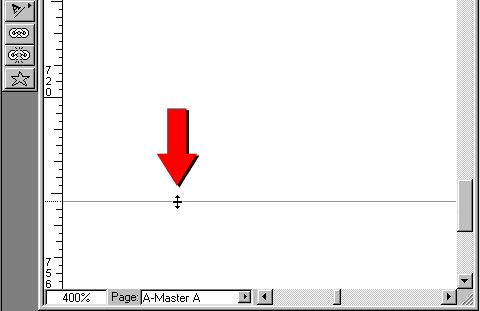
8. Drag another horizontal page guide to 739.5 points
and release the mouse button.
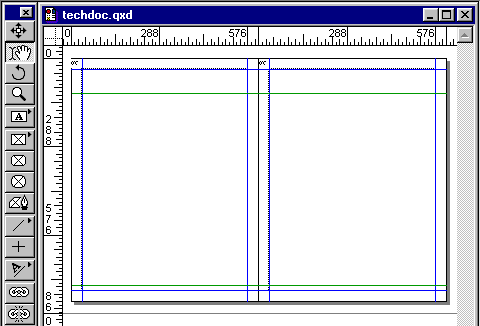
9. Repeat steps 5 through 8 for the facing page. When
you have completed all the steps up to this point your
master pages should look like the image below:
Click
Here To Continue...
|
|
 |
 |
 |
| |
Previous
Home
Contact Mike
Related Sites
Next
Copyright
© 1998-2016 Mike Doughty, All Rights Reserved Legal
Notices
Page Last Revised: October 26, 2016
Privacy Policy
|
|
|
|
|
|
|
|