|
|
Porting
Files Across Platforms Using FTP:
Part One |
 |
|
|
|
|
|
|
 |
|
Note:
This tutorial is only a very brief description of
a sample network. Networking is a complex subject,
but the newer operating systems make it a lot easier
than in the past. Nevertheless, you should be prepared
to make a tech support call or two if you've never
setup a network. Also, take care in purchasing networking
components to ensure compatibility. |
Porting files across platforms using FTP is another
way to use a network to share files between the Macintosh®
and Windows® operating systems. The previous tutorials
showed how to setup a Mac®-Win
network with PC MACLAN. In that setup, files can be
ported back and forth using the Finder on the Mac. This
tutorial describes an alternative method.
In some situations you won't be sharing files on a
continuing basis as with PC MACLAN. You may only need
to share files infrequently or port a few files at a
time or port a batch of files at one time. In this case,
you can use FTP (File Transfer Protocol).
The Basic Way This Works
The basic idea behind using FTP to port files across
platforms is simple. Both computers must be setup on
a network using the TCP/IP protocol and cabled together
with an Ethernet hub. This setup will work on Mac OS
8.5 or higher and on a PC running Windows 98 Second
Edition. Windows® 98 Second
Edition includes Internet Connection Sharing (ICS).
With ICS The PC is the host for the Internet connection
for the other (client) computers on the network. ICS
uses DHCP (Dynamic Host Configuration Protocol). This
basically means that it assigns an IP address (Internet
Protocol address) to each client computer on the network
- including the Macintosh®.
TCP/IP Configuration
TCP/IP (Transmission Control Protocol / Internet Protocol)
provides a means for computers with different hardware
and operating systems to communicate with each other
across the Internet. It uses a scheme whereby each computer
has a unique address that is recognized by the network.
In order for the Mac to be recognized by the network
it has to be assigned an IP address by the PC which
functions as the DHCP server. In the TCP/IP Control
Panel on the Mac, choose "Configure:" "Using
DHCP Server". This setting will cause the PC to
assign the Mac an IP address and allow it to be recognized
on the network. On the PC click Start > Run and enter
"winipcfg" (without the quotes) in the "Open:"
drop-down box. This will display the IP address of the
PC. It will be a number like 192.168.0.1. Write down
this number. You will need it later when using the FTP
client program on the Mac.
Always Use The Mac as The Client
In this setup, as with all Mac-Win networking, always
use the Mac as the Client and the PC as the host (server).
This is covered more thoroughly here: pcmaclan1.htm.
This means that the PC needs an FTP server
program and the Mac needs an FTP client
program.
Where To Obtain FTP Software
There are plenty of shareware programs available online
to install. In this example I use Anarchie 3.7 as the
FTP client for the Mac. This is available from http://www.stairways.com/.
On the PC I used the Microsoft®
Personal Web Server (included on the Microsoft FrontPage
98 CD). I used the Microsoft Personal Web Server (PWS)
in this tutorial mainly because my PC was already setup
with it. The PWS includes an FTP service which is adequate
for the task. If you don't have PWS you can download
the shareware version of FTP Serv-U from http://www.Serv-U.com.
This will work equally well, if not better.
The Basic Setup
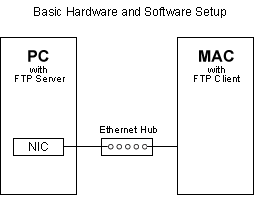
The basic hardware and software setup is shown below.
If the PC doesn't already have an Ethernet NIC (Network
Interface Card) installed, you'll have to obtain and
install one. Newer Macintosh computers come with an
Ethernet port already installed. The two computers are
cabled together using an Ethernet hub and category 5
cable.
Running The FTP Server on The PC
1. If the Web Server isn't already running,
open the Control Panel and double-click the Personal
Web Server icon to display the Personal Web Server Properties.
In the "Services" tab it will show that the
FTP service is not running ("Stopped").
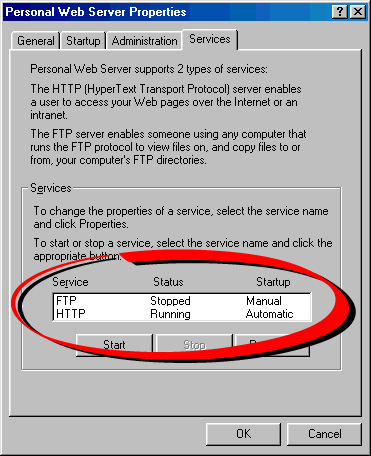
2. In the "Services" section
of the property sheet click the FTP service line, then
click "Start".

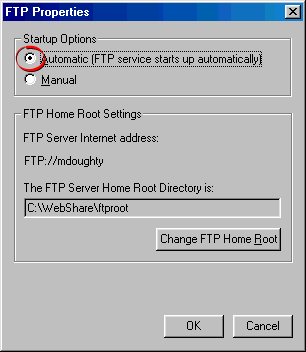
3. If you want the FTP service to startup
when the PWS starts, click the "Properties"
button while the FTP service is selected. You will see
a section entitled "Startup Options". In this
section choose "Automatic (FTP service starts up
automatically)".
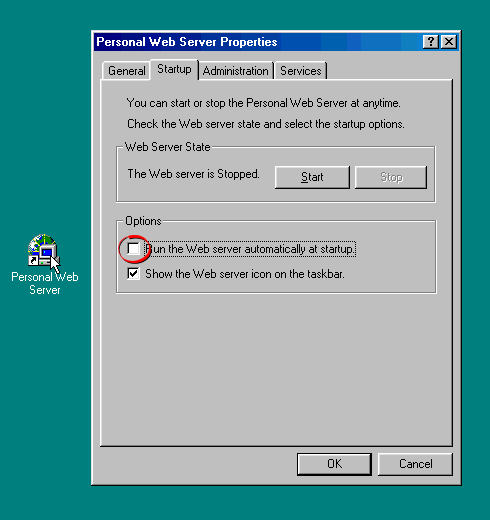
4. When you install the PWS, it will startup
automatically by default. This can be changed. In the
Control Panel right-click and drag the Personal Web
Server icon onto the desktop to create a shortcut. You
can start the PWS manually by double-clicking this shortcut.
Then, in the "Startup" tab, un-check "Run
the Web server automatically at startup".
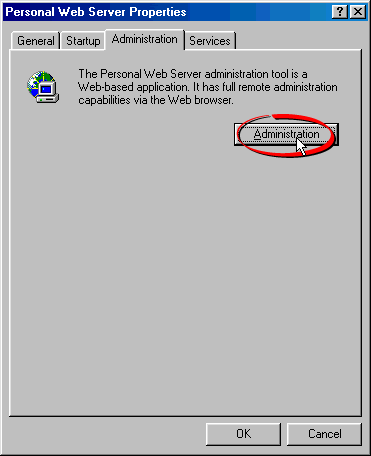
5. The default FTP root folder is C:\Webshare\Ftproot.
This also can be changed. In the "Administration"
tab of the Web Server properties, click the Administration
button.
Click Here To Continue...
|