|
|
Quick
Crop Marks For Adobe® InDesign®
Layouts -
Part One |
 |
|
|
|
|
|
|
Most page layout programs support the printing of page
marks (crop marks and registration marks) when outputting
documents to print. Sometimes, though, you will want
the page marks to be on the layout itself - such as
when preparing 2-up layouts or when ganging-up layouts
on a single page. It is common to gang-up several business
cards in a single layout. You can get 8 business cards
in a single letter-sized piece of film this way, which
can save a lot of money on film.
Although ganging-up layouts will save money on film,
drawing all those crop marks can be time consuming.
This tutorial takes advantage of InDesign's ability
to import editable vector objects in order to save time.
InDesign supports the pasting of vector objects from
the clipboard and the exporting of layouts to Acrobat®
PDF format. When exporting layouts to PDF, you can specify
that they include page marks. This tutorial takes advantage
of the fact that the PDF file containing the page marks
can be opened in Illustrator® where they can be
copied, then pasted back into InDesign as editable vector
objects.
1. To begin, launch InDesign and open the layout to
which you want to add crop marks.
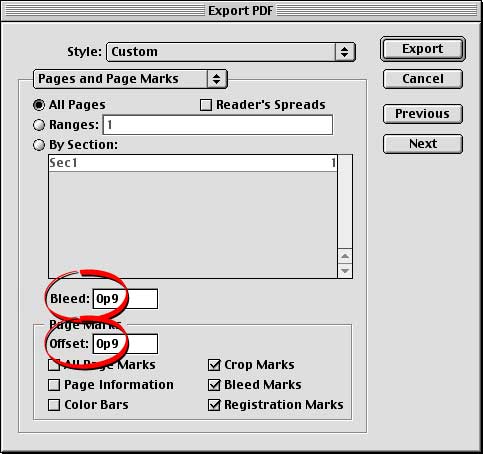
2. Click File > Export. In the Export dialog,
choose "Adobe PDF" from the "Formats"
pull down in the Mac® or "Save as type"
pull down in Windows®. Give the file a name and
click "Save". You will see the "Export"
dialog next. Click through to the "Pages and Page
Marks" dialog, and enter 9 points in the "Offset"
box. If your layout bleeds off the page, then enter
9 points in the "Bleed" box as well. Click
"Export" when done.
3. Load the PDF into Illustrator. Here you will see
the layout as well as the page marks.
4. Delete everything except for the page marks.
5. Now marquee-select everything, or click Edit
> Select All. Next click Edit > Copy
to copy the page marks to the clipboard.
6. Switch back to InDesign and click Edit > Paste.
The "Paste" command centers the objects on
your layout. You may have to click Object > Ungroup,
then select the crop marks, then click Object >
Compound Path > Release to be able to select
and edit these objects individually.
Click Here To
Continue...
|