|
|
Cool
Type Effect With Canvas™ 7
Part One |
 |
|
|
|
|
|
|
Deneba Canvas 7 features SpriteEffects™, a new
technology that allows editable live effects on vector,
paint and text objects. This is a huge advance and can
only be fully appreciated when you see how these effects
can be used. You can create finished works for both
print or screen displays directly from Canvas or you
can port them to other applications and use them for
other projects. This tutorial is only a tiny sampling
of what's possible.
 |
|
 |
Here's how it works. Live effects are available on
a number of graphics applications - Macromedia®
Fireworks® and Adobe®
ImageReady® just to name two.
Live effects are simply effects that are removable and
editable. For example, you can apply a bevel effect
to a paint object, then remove it or change it without
affecting the pixels of the paint object and having
to completely recreate it from scratch. You can attach
more than one effect to an object, reorder them, add
more or remove them at will. This is a major advance
for productivity and creative freedom.
But Canvas is unique because of its integrated bitmap
and vector environment. As a result, these effects can
now be used in print media as well as for screen presentations
such as web pages. This tutorial will explore the creation
of a type effect in Canvas, then we will port this effect
over to Adobe Photoshop® and Adobe InDesign®.
You don't need InDesign or Photoshop to do this tutorial.
I chose to include examples of how to port these effects
over to these applications just to illustrate how flexible
these effects are.
The rendered SpriteEffects themselves are pixel-based
(bitmaps). When an effect is applied, it doesn't change
the object. A new bitmap image is rendered. You can
adjust the resolution of the rendered effect. You can
select a high resolution and use the effect in a print
project. If you apply an effect to a vector object,
you can resize the object and achieve a perfect rendering
with no loss in quality.
There's more good news. You can use third party plug-ins
for these effects. Most Photoshop-compatible plug-ins
are supported by Canvas (some are not). This another
huge benefit. For most users with a variety of these
plug-ins, all they need to do is get Canvas 7 and point
to the plug-ins folder in the preferences setup. So
let's get started.
What You Will Need For This Tutorial
This tutorial uses the Extensis®
PhotoBevel plug-in. The people at Extensis have generously
made this plug-in available for free.
You can download it from their web site at http://www.extensis.com.
If you do have Photoshop, install it in the Photoshop
Plug-Ins folder. If you don't have Photoshop, then install
it or move it to a different folder and point to this
folder in the preferences setup.
This tutorial uses the font, Mistral - which is included
in the full version of Canvas on the installation CD*.
You need to install this font and make it available
to Canvas. If you don't have this font, then you can
pick a similar one.
*Font packages may vary. Check it out for yourself
before buying anything.
1. First, if the PhotoBevel plug-in was installed in
the Photoshop Plug-Ins folder, you need to point to
that folder in the preferences setup. Start Canvas 7
and click File > Preferences and select the
"Painting" tab. Click the "Plug-ins"
button and navigate to the folder on your hard drive
that contains the plug-in. This change doesn't take
effect until the next time you start Canvas, so you
have to exit the program and restart it.

2. When you restart Canvas you will see the following
dialog:
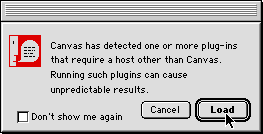
You need to click the "Load" button to activate
the plug-in and make it available to Canvas.
 |
|
Note:
If you hand off a Canvas file to a service provider
that uses a third party plug-in for a SpriteEffect,
that same plug-in must be installed on their hard
drive for the effect to be rendered. |
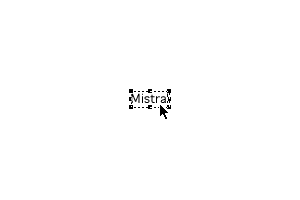
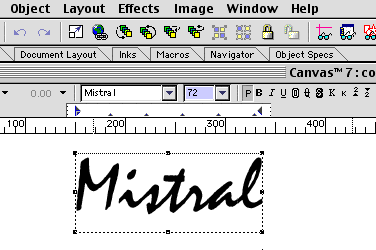
3. Select the Text tool and type the word "Mistral"
anywhere on the layout area.

4. Choose the Selection tool and the new text object
will be selected.
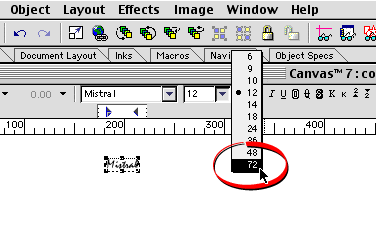
5. If the Text Ruler isn't active, click Layout
> Display > Show Text Ruler. Click the drop
down arrow next to the font box.
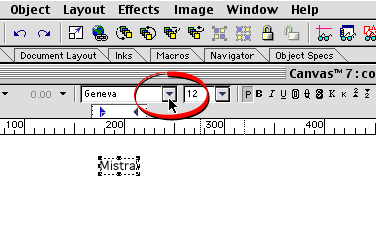
6. Choose Mistral for the font, then click the drop
down arrow for the point size.
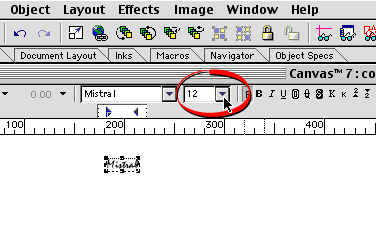
7. Choose 72 for the point size.
8. This is what your new text object should look like.
The text should appear black if the default pen ink
is black.
Click
Here To Continue...
|