|
|
Quick
and Easy Gel Buttons in Canvas™ 7
Part One |
 |
|
|
|
|
|
|

This tutorial expands on the original
aqua
gel button tutorial and shows how you can easily
create a rainbow of colored gel buttons with Canvas
7. Anyone with intermediate level skills should be able
to follow this tutorial. You can always refer to the
original aqua
gel button tutorial for more detail. I can't think
of an easier way to create these buttons because, as
you will experience for yourself, when you work with
vector objects and SpriteEffects™, changing the
color of the button is nothing more than a couple of
clicks away.
Additionally I want to give credit and
thanks to Mike Dawson who contributed to this tutorial.
Through the exchange of emails, we were both searching
for an easy way to make rainbow colored Canvas gel buttons.
I was hacking away at RGB values when he hit upon the
idea to use the HSL color model. This was clearly the
easiest way. He also contributed ideas for making drop
shadows as well as for making grayscale versions of
the buttons. These contributions were much appreciated
by myself and hopefully to other Canvas users who may
find this information useful.
The following description, "Deconstructing
The Gel Button Master", is a only brief relative
of the original aqua
gel button tutorial. You can either download the
master buttons in Canvas 7 format or build them from
scratch by using the specifications and screen shots
below.
1. Shown below is a screen shot of the
master button. There is another variation of this master
later in the tutorial, but you can start with this one.
You can download the master button (below right) and
skip the section on "Deconstructing The Gel Button
Master" then continue with the sections on making
rollover buttons and changing colors if you want.
Deconstructing The Gel Button Master
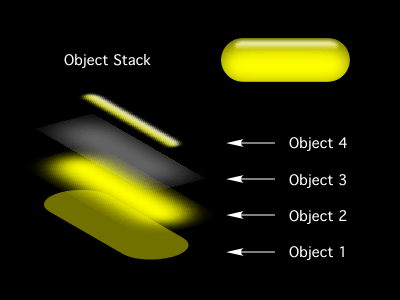
2. Shown below is a representation of
the gel button's object stack. There are only four objects
(other than a clipping path). You build the button from
the bottom up. You start by making "Object 1"
then add Objects 2 through 4 as you build it. None of
the objects are stroked, so if you are making it from
scratch, make sure to give each object a pen width of
"No Stroke" (click
here for more details).

3. Create a new Canvas document, then
select the Rounded Rectangle tool. Next, draw a rounded
rectangle in the work area. This will be "Object
1". For more detail, see the original aqua
gel button tutorial. Display the Object Specs palette
and use the specifications in the screen shot below
right for its size and position. Bring up the Inks palette
and using the Color manager display the "HSL Wheel"
or "HSL Bars" and give this object a fill
ink with the following HSL values:
H=60, S=100, L=15
(Hue = 60, Saturation = 100, Lightness = 15)
4. To make "Object 2", either
make a duplicate of the first rounded rectangle or draw
a new one with the Rounded Rectangle tool. For more
detailed instructions on how to duplicate an object,
click
here. Again, using the Object Specs palette, enter
the specifications in the screen shot below right for
it's size and position. Using the Color manager give
it a fill ink with the following HSL values:
H=60, S=100, L=50
We need to apply a Gaussian Blur to this
object so click Object > SpriteEffects
> Add Effect > Blur > Gaussian Blur, and
enter 9.1 pixels in the dialog. Note:
The size and position of this object is slightly different
than the original aqua
gel button tutorial. There will be a few differences
between this gel button and the original. The reason
is that I was trying to make a more universal button
(a master) to which a change in color could easily be
applied without altering the characteristics of the
button.
5. Again, either duplicate one of the
rounded rectangles or draw another one to make "Object
3". Using the Object Specs palette, enter the specifications
in the screen shot below right for it's size and position.
Give it a plain white fill ink from the default RGB
colors in the Inks palette. Apply a Gaussian Blur to
this object by clicking Object > SpriteEffects
> Add Effect > Blur > Gaussian Blur. Enter
17 pixels in the dialog. Then bring up the Transparency
palette and set the opacity slider to 50%.
Click
Here To Continue...
|