|
|
Resolution
Basics:
The End of "Resolution Confusion" |
 |
|
|
|
|
|
|
What Is "Resolution" and How Do I Use
It?
Bitmap images are composed of pixels. Image "resolution"
is simply the number of "Pixels Per Inch"
(PPI) in the bitmap grid. There are two aspects to every
bitmap image - its size (width and height in inches)
and resolution (the number of pixels per inch). These
two factors alone determine the total number of pixels
in an image. For example, a 2 inch by 3 inch image with
a resolution of 300 pixels per inch contains (2 x 300)
x (3 x 300) or 540,000 pixels.
The more pixels there are in an image, the more detail
the image can be displayed with. The fewer pixels there
are in an image, the less detail the image can be displayed
with. There are two ways to display an image - on screen
and in print. When you are preparing images you need
to know what resolution to scan or size them to. There
is an optimum resolution for each and it is very easy
to determine.
First let us take up screen display. This is the easiest
to determine. Scan or size them all to 72 PPI. Why?
A monitor on a Macintosh system displays at 72 PPI.
A monitor on a Windows system displays at 96 PPI. Though
there is a difference between the two, the standard
for screen displays is 72 PPI. Piece of cake!
Continuous Tones
Determining image resolution for printed output is
a little bit different because of the way an image gets
printed. A typical photograph like a snapshot or 8 x
10 glossy of your favorite movie star is known as a
"continuous tone" photo. It is called a continuous
tone because of the gradual changes of tones of color
or shades of gray (for black and white photos).
Halftones
It is not practical to print continuous tones on a
printing press so a method was developed to simulate
the changes in tone using only black ink for black and
white photos. For a photo to be printed on a printing
press it must first be converted into a "halftone".
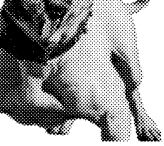
A halftone is an image whose continuous tones have been
converted to a pattern of solid dots. When viewed as
a whole, this pattern of dots appears as a continuous
tone, when, actually, it is not.
| |
|
 |
| |
 |
 |
 |
 |
This grayscale image when printed is really composed
of a pattern of dots. |
Using a camera and film, you could take a continuous
tone positive and expose a negative with an ordinary
window screen positioned between the lens and the film
and produce a halftone. The light passing through the
screen will diffuse and create the halftone dots. Professional
litho houses and printers have been using a method similar
to this, although not with a crude window screen. With
computer graphics it is done by the software and the
printer. You can create your own halftones on a laser
printer to get a feel for this.
A halftone is expressed in terms of the "screen
frequency" - the number of "Lines Per Inch"
(LPI) of the screen used to prepare it. The number of
lines per inch is also referred to as the "Line
Screen" (LS) of the halftone. Halftones appearing
in a typical newspaper range from 65 to 85 line screen.
These are coarse halftones because the paper is very
porous and rough and requires a larger dot size than
the smooth, coated stock used in magazines or brochures.
Halftones appearing in magazines, brochures and high
quality catalogs typically vary between 133 and
150 line screen.
When preparing images for printed output you must know
the screen frequency of the finished halftones before
scanning or sizing them. Find out from the printer what
is required for the job. There are a lot of variables
you need to nail down ahead of time such as the type
of paper, the capability of the printing press, what
kind of printing plate will be used (paper or metal)
and whether the plate will be exposed from a shooting
board positive or a film negative.
Once you know the screen frequency of the finished halftone,
you can scan and otherwise prepare your images. There
is a rule of thumb used in preparing images for printed
output. Scan or size images at a resolution (PPI) of
1.5 to 2 times the screen frequency (LPI) of the finished
halftone. For example, a 2 inch by 3 inch photo would
be scanned or sized to a 2 inch by 3 inch image at 225
to 300 PPI for a finished halftone at 150 LPI (150 line
screen). Were the same photo to be printed using a 120
line screen halftone, it would be scanned or sized to
2 inches by 3 inches at 180 to 240 PPI. This is a very
workable rule and is easy to remember.
You Determine The Halftone Frequency In The Layout
Once you have prepared your images, you import them
into the page layout program such as QuarkXPress™,
Adobe® PageMaker®, Corel VENTURA®, Microsoft®
Publisher or whatever you are using. In the picture
boxes or print dialog you fill in the data fields telling
the software what screen frequency to print the halftones.
The laser printer or high-end imagesetter uses this
information at output time and produces the halftones
on paper or film from the digital data. You use grayscale
images for black and white halftones and CMYK (not RGB)
color images for color separations.
Click
Here To Continue...
|