|
|
Understanding
Transparency Masks In Canvas™ 6 - Part One |
 |
|
|
|
|
|
|
Deneba Canvas 6 offers many combinations of transparency
effects with the use of masks. Canvas 6 also provides
for general object opacity in addition to the
use of transparency masks. A mask is different in that
it is an overlay for your art that allows some areas
to show through while blocking out others. In the case
of a transparency mask, it is an object which uses grayscale
data (whether grayscale data from a bitmap or
vector representation of grayscale) in which the white
areas allow the image to show through and the black
areas act to block the image thus rendering these areas
transparent.
There are two types if transparency masks in Canvas
- vector and bitmap. Where one of these types uses vectors
to define the mask areas, the other uses pixels. In
Canvas, a pixel-based or bitmap mask is called a Channel
Mask because it is stored as a grayscale channel similar
to an alpha channel used to store a selection marquee
an in image.
Either type of transparency mask can be attached to
any type of object. This makes Canvas very flexible
in that it allows either a channel mask or a vector
mask to be attached to either a paint object, vector
object or text object. The chart below illustrates the
concept:
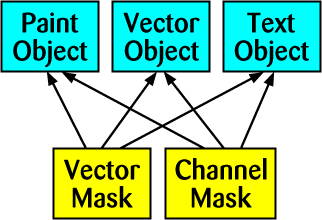
As a result, there can be a lot of varied combinations
of objects and transparency masks. In this tutorial
we will explore some of them.
Vector Transparency Masks
The concept of using a vector object as a mask is very
simple, really. Bitmap transparency masks have been
around for years in image editors such as Adobe®
Photoshop®. Vector gradients
have also been around for years in illustration programs
including Deneba Canvas, CorelDRAW®,
Adobe Illustrator® and Macromedia®
FreeHand®. Canvas 6 applied
the concept of using a vector gradient as a mask.
The gradient in a vector transparency mask has one of
four basic shapes. These are the same as the basic gradient
shapes available in the Inks palette for strokes and
fills - radial, directional, rectangular and elliptical.
In the Toolbox are a set of tools for creating vector
transparency masks:
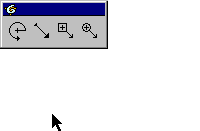
The Vector Transparency tools
lie under the effects tools in the toolbox
|
|
Tear off the Vector Transparency
tools
and select a tool |
 |
|
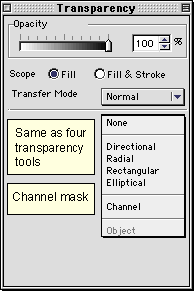
Masks made from each of
these tools can be created
using the Transparency
palette (below) |
|
 |
|
Alternately, the Transparency palette can be used
to create each of the four basic vector transparency
masks as well as a channel mask. |
Transparency Mask Examples
1. To create a transparency mask simply select the
object you wish to mask and either click Object >
Transparency > New Channel Mask to make a channel
mask or use one of the Vector Transparency tools described
above to create a vector mask. Alternately, you can
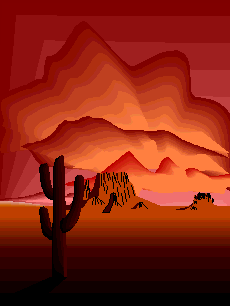
use the Transparency palette. Shown below are two images
- a bitmap (paint object) on the left and a vector image
on the right. We will attach a vector mask on one and
a channel mask on the other, then we'll switch them
around.
 |
|
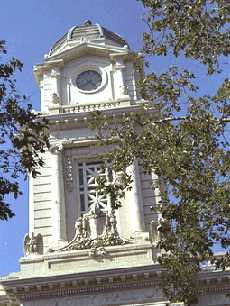
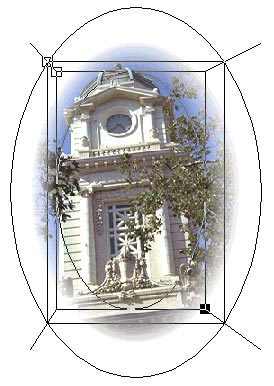
2. Let's start with
the paint object. Select it, then choose the Elliptical
Transparency Tool and drag an elliptical mask over
the image. Adjust the handles until you achieve
the desired effect. |
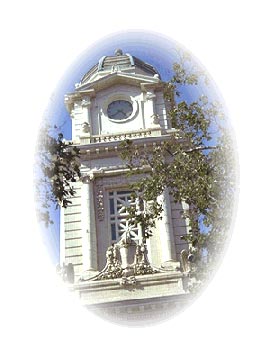 |
|
3. The result is a pleasant vignette which focuses
on the building. |
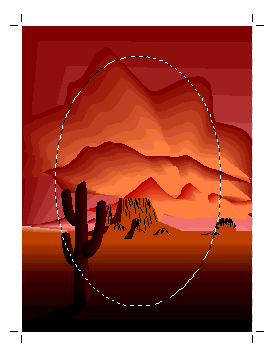
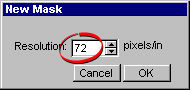
4. For the vector object, let's create a channel mask.
Select the image and click Object > Transparency
> New Channel Mask. In the dialog, choose 72
ppi for the resolution, then click "OK" (below
right). Canvas throws a paint object over the image
and puts into edit mode. Begin by choosing the Oval
Marquee tool and drag out an oval-shaped selection (below
left).
Tip: Use Ctrl-Drag from the center outwards (Mac®
users begin dragging before pressing Control). For instructions
on how to float and move the selection to reposition
it, click
here.
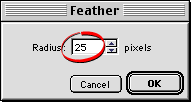
5. Next click Image > Select > Inverse,
then Image > Select > Feather. In the dialog,
enter a feather radius of 25 pixels. Click "OK"
when done.
Click
Here To Continue...
|